How to find your way around Ads Manager
If I had a pound for every time someone said to me “I hate Facebook”…
I don’t think they really hate Facebook. They just dislike the unknown and, with Facebook’s constant layout changes and updates, even if you do feel like you’ve got to grips with the intricacies of Facebook, Ads Manager and Business Manager, that can suddenly change from one day to the next!
Ads Manager can feel intimidating if you’re new to Facebook ads. But, once you know where everything is (or at the very least the important bits) and what they all do, hopefully you will be more comfortable about making a start with using ads.
What is Facebook Ads Manager?
Now, to further complicate things, there are currently two versions of Ads Manager in circulation. They’re not vastly different, they just look slightly different.
So you may have something that looks like this:
Or, it may look like this:
Either way, this area is the “home” for all of your ad campaigns and where they will eventually sit, when they’ve been created.
So, a busy Ads Manager, with ad campaigns up and running, will look more like this:
The main menu that we’ll be running through in this blog is held in the “nine dots” on the left hand side, next to the Ads Manager title.
And you’ll see when you click on it, it contains:
- Ads Manager
- Events Manager
- Audiences
- Business Settings
- Billing
- Account Quality
We’ve covered Ads Manager, so the next area to look at is Events Manager.
What is Events Manager in Facebook Ads Manager?
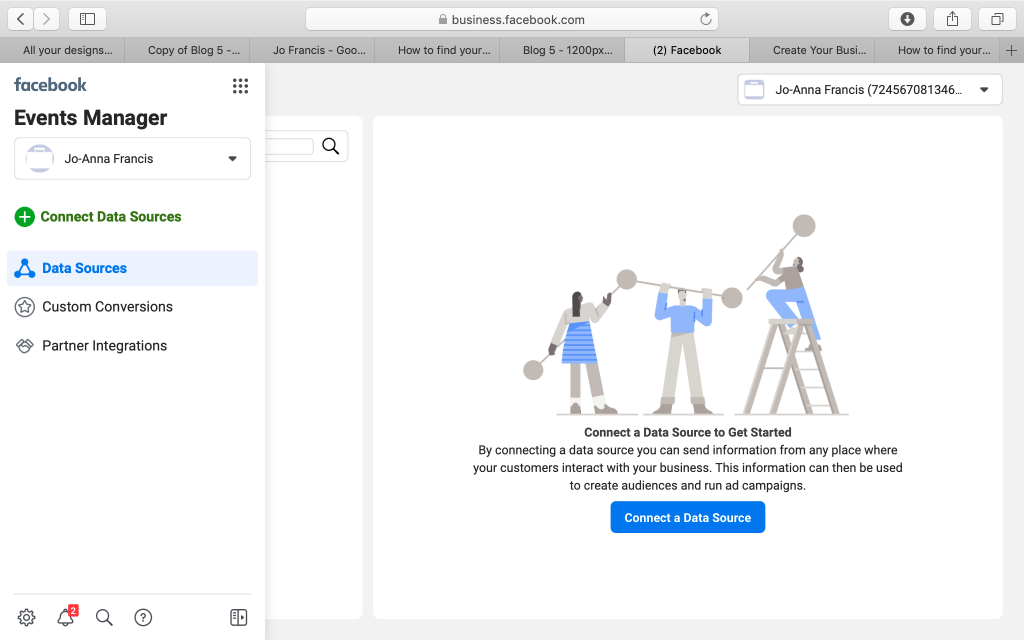
Events Manager is home to:
- Data Sources
- Custom Conversions
- Partner Integrations

What are Facebook Data Sources?
Data Sources is where you will create and locate your pixel.
This is where you can set up your pixel, get the code to install it (more details on this can be found here) and also, once it is installed on your website, you can get an overview of the analytics for the activity taking place on your website.
What are Custom Conversions on Facebook?
Custom conversions are a way of measuring the outcome of your ads. Facebook has its own explanation, but does make it sound VERY complicated! Basically I always think of a custom conversion as the “thing” you want someone to do – download your PDF, sign up to your masterclass, buy your book… So to create the conversion event, you pretty much need the URL that PROVES they’ve done that “thing”. And this is generally the thank you page URL that someone will see AFTER they have signed up, opted in or made a purchase.
So when you create your ad, you will be sending visitors to the landing page for your download, your masterclass, your product, and Facebook will register the number of people that click the link to visit that page. But your actual conversion will be the number of people that take the required action.
What are Partner Integrations in Facebook Ads Manager?
Partner Integrations pretty much does exactly as it says; it allows you to easily set up your events without code by connecting the partner accounts you already use for customer interactions, website or data management.
There are ecommerce integrations for things like EventBrite and WooCommerce, website platform integrations for Joomla, SquareSpace and WordPress to name but a few along with a whole host of other integrations with well known software like Zapier, Infusionsoft and HubSpot.
None of this is essential, so don’t let it freak you out! You can bypass Partner Integrations totally and it won’t affect you getting to grips with Facebook ads.
The next area to look at is Audiences.
How do you create Audiences for Facebook ads?
Now if you’re new to Ads Manager, it’s likely you’ll have nothing in here. And that’s fine. Once you’re up and running with Facebook ads, you’ll start to create more and more audiences.
But here’s the really important tip – once you’ve installed your Facebook pixel, you MUST create an audience to start capturing the data that the pixel is receiving when people are visiting your website. You can create a single audience (everyone that visits your website) or you can break it down and use the URLs of the individual pages of your site, to create very specific audiences (which is good for retargeting).
You’ll see the Create Audience button, which gives you various options when you click on that (I feel another blog coming along about audience creation!) and for now what you want to focus on is Custom Audience; Website.
The first option you’re presented with will look like this:
And that would create your “All Website Visitors – 30 Days” audience. It’s a dynamic audience, so will keep filling with the people that have visited your website (in the 30 day period). It does not back date though, so it will start filling going forward, and cannot gather retrospective data, which is why it’s so important to get this audience created. You can change the number of days, i.e. 60 days, 90 days, 365 days.
Once you’ve fully investigated Audiences, you may want to head back into the 9 dots menu and check out Business Settings.
What are the Business Settings for in Facebook Ads Manager?
Now I will say, what people see here does vary, so if you’re reading this and looking at your own account and thinking “this looks completely different” that may be why. I am trying to use an unused account to show examples, but there still may be variations.
So, hopefully you will see something like this:-
And what this is showing you is Facebook’s Business Manager. You can check out all the information about Business Manager directly from Facebook themselves here.
There are, for me, two main reasons to ensure that you have Business Manager set up:
1. To enable you to effectively work with partners on your ad accounts (partners being individuals and companies like my own who you may call on to assist you with advertising).
2. To be able to use customer lists to create audiences. Your current email marketing list and customer list are THE BEST examples of your warm audiences, and although that may lead you to think that you then don’t need to be using Facebook ads to promote yourself to them, being able to upload these lists to Facebook and use them to build an audience also gives you the opportunity to create a “lookalike” audience – which will be an audience of people that closely match your existing audience. These lookalike audiences can often be the strongest of the “cold audiences’.
Now you have an understanding of Business Manager, head back into Ads Manager and the next area on the menu is Ad Account Settings.
What will Ad Account Settings show in Facebook Ads Manager?
This area pretty much does what it says on the tin! It’s the settings on your ad account, and you can adjust your time zone, currency etc and complete the details of your business.
The final area to look at is Account Quality.
What happens in the Account Quality section in Facebook Ads Manager?
This area will be more relevant when you are up and running with ads as it will show you if there are any policy violations on your ads, which would result in yoru ads being rejected. You can then make adjustments to your ads and ask for them to be reviewed.
You may think that you are highly unlikely to be running ads that would offend the Facebook powers that be, but trust me, EVERYONE gets an ad or two rejected at some point, and it can be a real test of patience trying to fathom out which word or phrase is causing a problem.
As you become more confident with setting up and running ads, you’ll see that there are other areas within Ads Manager to take a look at such as reporting, analysis and audience insights. For now though, I hope that this blog has given you a better insight and made you feel more comfortable with Ads Manager.
If you need any help along the way, either with getting started with Facebook ads or setting up and running your ad campaigns, you can find out more about how to work with me here.

